
2026-10-09 APP 2.0.0-beta48 has been released !
This is mainly a bug fix release for the reported bugs in beta47. In addition it has a significant User Interface performance improvement noticable when you need to process 1000s of images in APP.
2026-10-03 APP 2.0.0-beta47 has been released !
This is a very big release... many code optimizations/rewrites, many parts of APP are much faster and more precise, especially star analysis and registration are much faster ! Big mosaics will go much faster 🙂
And we introduce a new preview filter, which includes the new Adaptive Deep Sky Stretch and a General Levels Stretch, this has been long over due. The old preview filter (the panel on the right side to stretch and preview your data) has not been updated for a couple of years and it is a critical part of any APP session.
Adaptive Deep Sky Stretch or ADSS is a much more intuitive stretch algorithm. It is also color preserving (which is a great new addition in itself ! ) which means that the highlights are no longer bleached, color is maintained from the linear data while stretching. You can simply stretch your data using the sky background level and signal width sliders which work much easier and more intuitive. You no longer need to fiddle with the old complicated sliders with zoom buttons. All the zoom buttons for the sliders are made redundant. And you can enter slider values in the slider value fields yourself. I will make a youtube video in the coming days to explain and fully introduce ADSS. Once the video is ready, it will be highlighted on the forum.
RGB Combine upgrade !. The RGB Combine Tool has been rewritten mostly. The tool is faster and easier to use and most importantly, the Luminance slider to inject a luminance channel or channels into the RGB composite is now working correctly. It no longer bleaches the RGB colors. Combined with the new ADSS preview, you will get much better and easier great composites with great color! I will also explain this in a new youtube video.
Hello
I am working on MBP M4Pro Max and if star analyser and registration is faster, normalization (non overlap) is very slow compare to past versions.
I preprocessed something close to 700 images R, G, B, S, H, O and normalization took a much longer time than before (maybe something close to 1-2 seconds per image. Before these last versions the time for 700 images was very fast (several seconds for all). Images have 100 Mpix (Moravian C5)
Anyway, there is something I don't understand in the reasonnement :
Why normaization reflect to the reference image ? As if a red image is reference, all S, H, O will be normaliezd along this red one ?
The real (or optional) procedure should have each stack get normalized with its own reference. Usually I find a green image to be set as reference. There are lot of stars and maybe some gradients or huge signal on it. If I take for example the OIII ones, signal is very low and I don't understant why it is normalized with the green reference.
Please explain if I am wrong
Best,
Philippe
Hi Philippe @philippe-bernhard,
Thank you very much for sharing your concerns and feedback.
Please check the release notes for 2.0.0-beta42, in beta42 5) Normalize was completely improved which explains why it is a bit slower. It is slower because the actual calculations are now improved and more robust.
On my macbook pro M4 max, the new normalization engine is also slightly slower, but still very fast I think. Since your images are 100Mpix, it explains why it is slower. Now the normalization parameters are calculated using all non-zero pixels. The old engine always analysed only part of the image (using blocks spread over the data to be analysed) , so the results were less robust but much faster.
I think the new engine should work better on normalizing all your R,G,B,S,H,O when compared to pre bet42 versions, because both the lokation and the dispersion are calculated differently in a mathematical/statistical sense. Also the MRS gaussian noise value is more precise in the new engine. Did the normalization work okay or not with beta43? The new engine should work much better with bright/HDR objects.
I agree that normalizing different filter data can be difficult epsecially if some filters have strong gradients/light-poillution. In those cases, normalization can be improved if you normalize without scale, so use add or multiply without scale. But best would be that the data is corrected for the gradients before the scale is calculated actually. Then all should work robustly, so also normalizing between broadband and narrowband filters.
What I want to implement to make this work better overall and for your case, is to have Local Normalization Correction to be applied before 5) Normalize, then the gradients are gone and dispersion measures are not affected by any possible gradients. Or maybe better, the data to be normalized should dynamically be corrected for gradients (like LNC does) and the parameters should be calculated on those corrected images. I need to test which is the most efficient and fast way to make this work and implement in APP going forward.
Finally, if like you suggest, to only normalize inside each filter and not all combined, then you still need to normalize those filter stacks in some way before making a good composite.
If the new engine is not improving things with your data, then please share a dataset with me that clearly shows this problem 😉 It is in fact still on our issue list as well because you have reported this in the past.
You can upload it here:
https://upload.astropixelprocessor.com/
username: uploadData
password: uploadTestData
Please make a folder with your name and issue like: Philippe-RGBSHO-normalization
and upload the data there and let me know once done.
- 5) NORMALIZE upgraded ! More robust and better with bright/HDR objects.
The normalization engine has been upgraded. The calculations of the sky background (lokation) level and the dispersion (the spread of the pixel values relative to the sky background) have been improved. Previously we calculated the sky background and the dispersion in blocks spread over each image (or overlap area) and not the full image/overlap area was analysed. This was a fast and effective method. But in the new normalization engine, the whole image or overlap area is now analysed and not in blocks. We are using very fast sorting of all the pixels values and we then aggressively clip the distribution on both the positive and negative side to get a very good sky background estimate. We then calculate the dispersion as MAD or BWMV on only the truncated distribution. Testing has shown that these methods are more robust on data with bright/HDR object and strong gradients. OVeral the sky background/lokation and dispersion values will be more robust leading to better image normalization and also better initial background neutralization by the normalization engine and the neutralize-BG option below the histogram. Initial normalization for mosaics with bright objects will be much better as a consequence. Previously we had two modes in the normalization engine: regular and advanced.
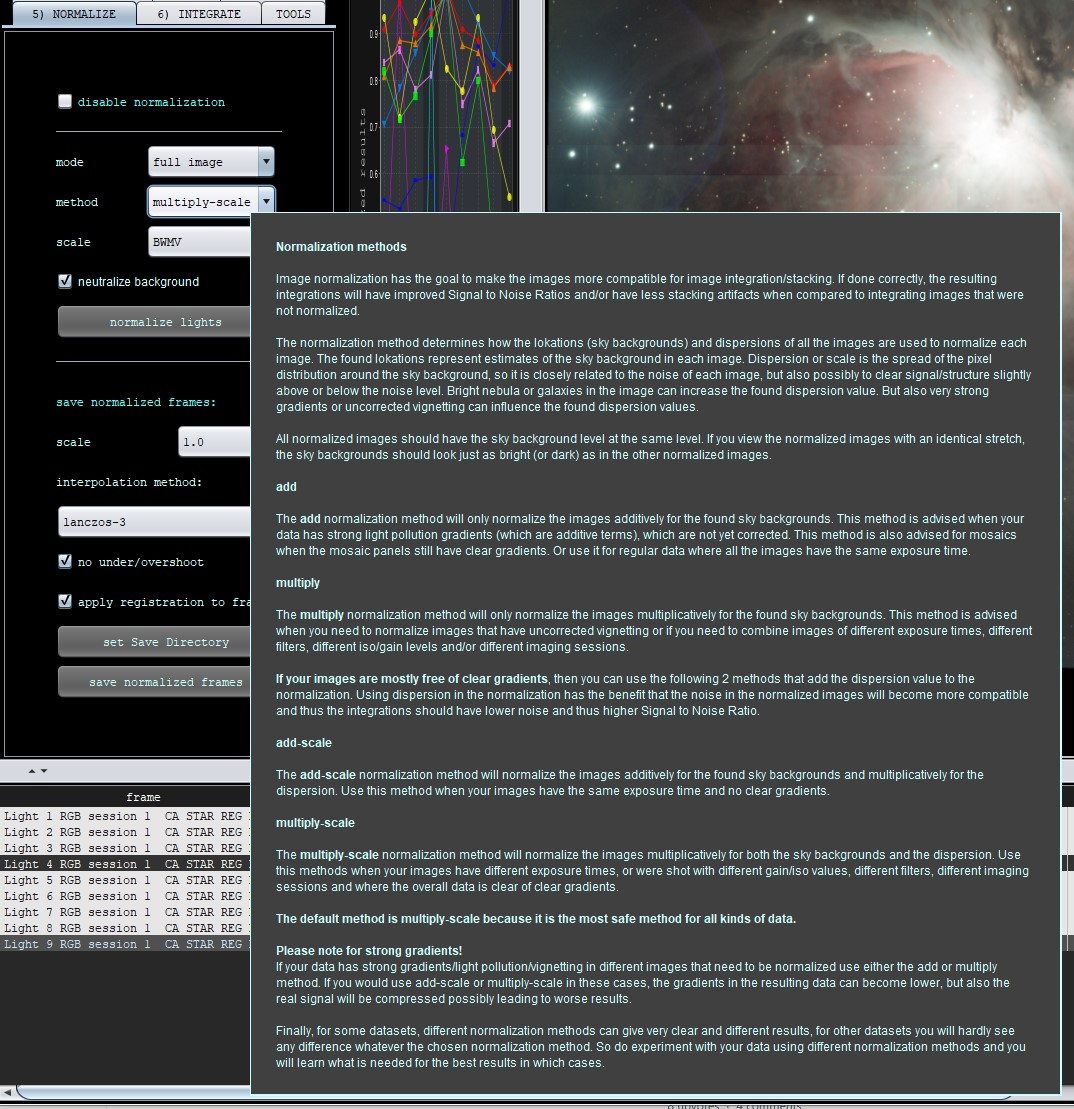
The new engine still has 2 modes, but they work differently and so we have renamed them. The first mode is now called full-image. This mode is most similar to the previous regular mode. The new second mode is called overlap area and this mode is more similar to the old advanced mode. Full-image always analyses each image fully as the name indicates. Overlap area mode will only analyze the overlap area between the image to be analyzed and it's reference frame. If you run a mosaic, and an image does not overlap with the main reference, another frame that does overlap with the image to be analyzed will be used to calculate the overlap area. Simply put, for normal registration where most images overlap almost fully, using any mode will give nearly identical results. if the images have some difference in Field Of View, the overlap area will be more robust because the sky background and dispersion will be based on exactly the same field of view. If however, you run a classic mosaic, like a 5x5 mosaic with only 10% overlap between the images, the full image mode will be best. All is explained as well in new tool tips, the little pop up menus attached to each option. The below screenshot shows the initial normalization of a 3x3 HDR mosaic of M42 with the new normalization engine in Full-image mode. The sky backgrounds already match very well. LNC and MBB only need to do little work to make it a seamless mosaic now.
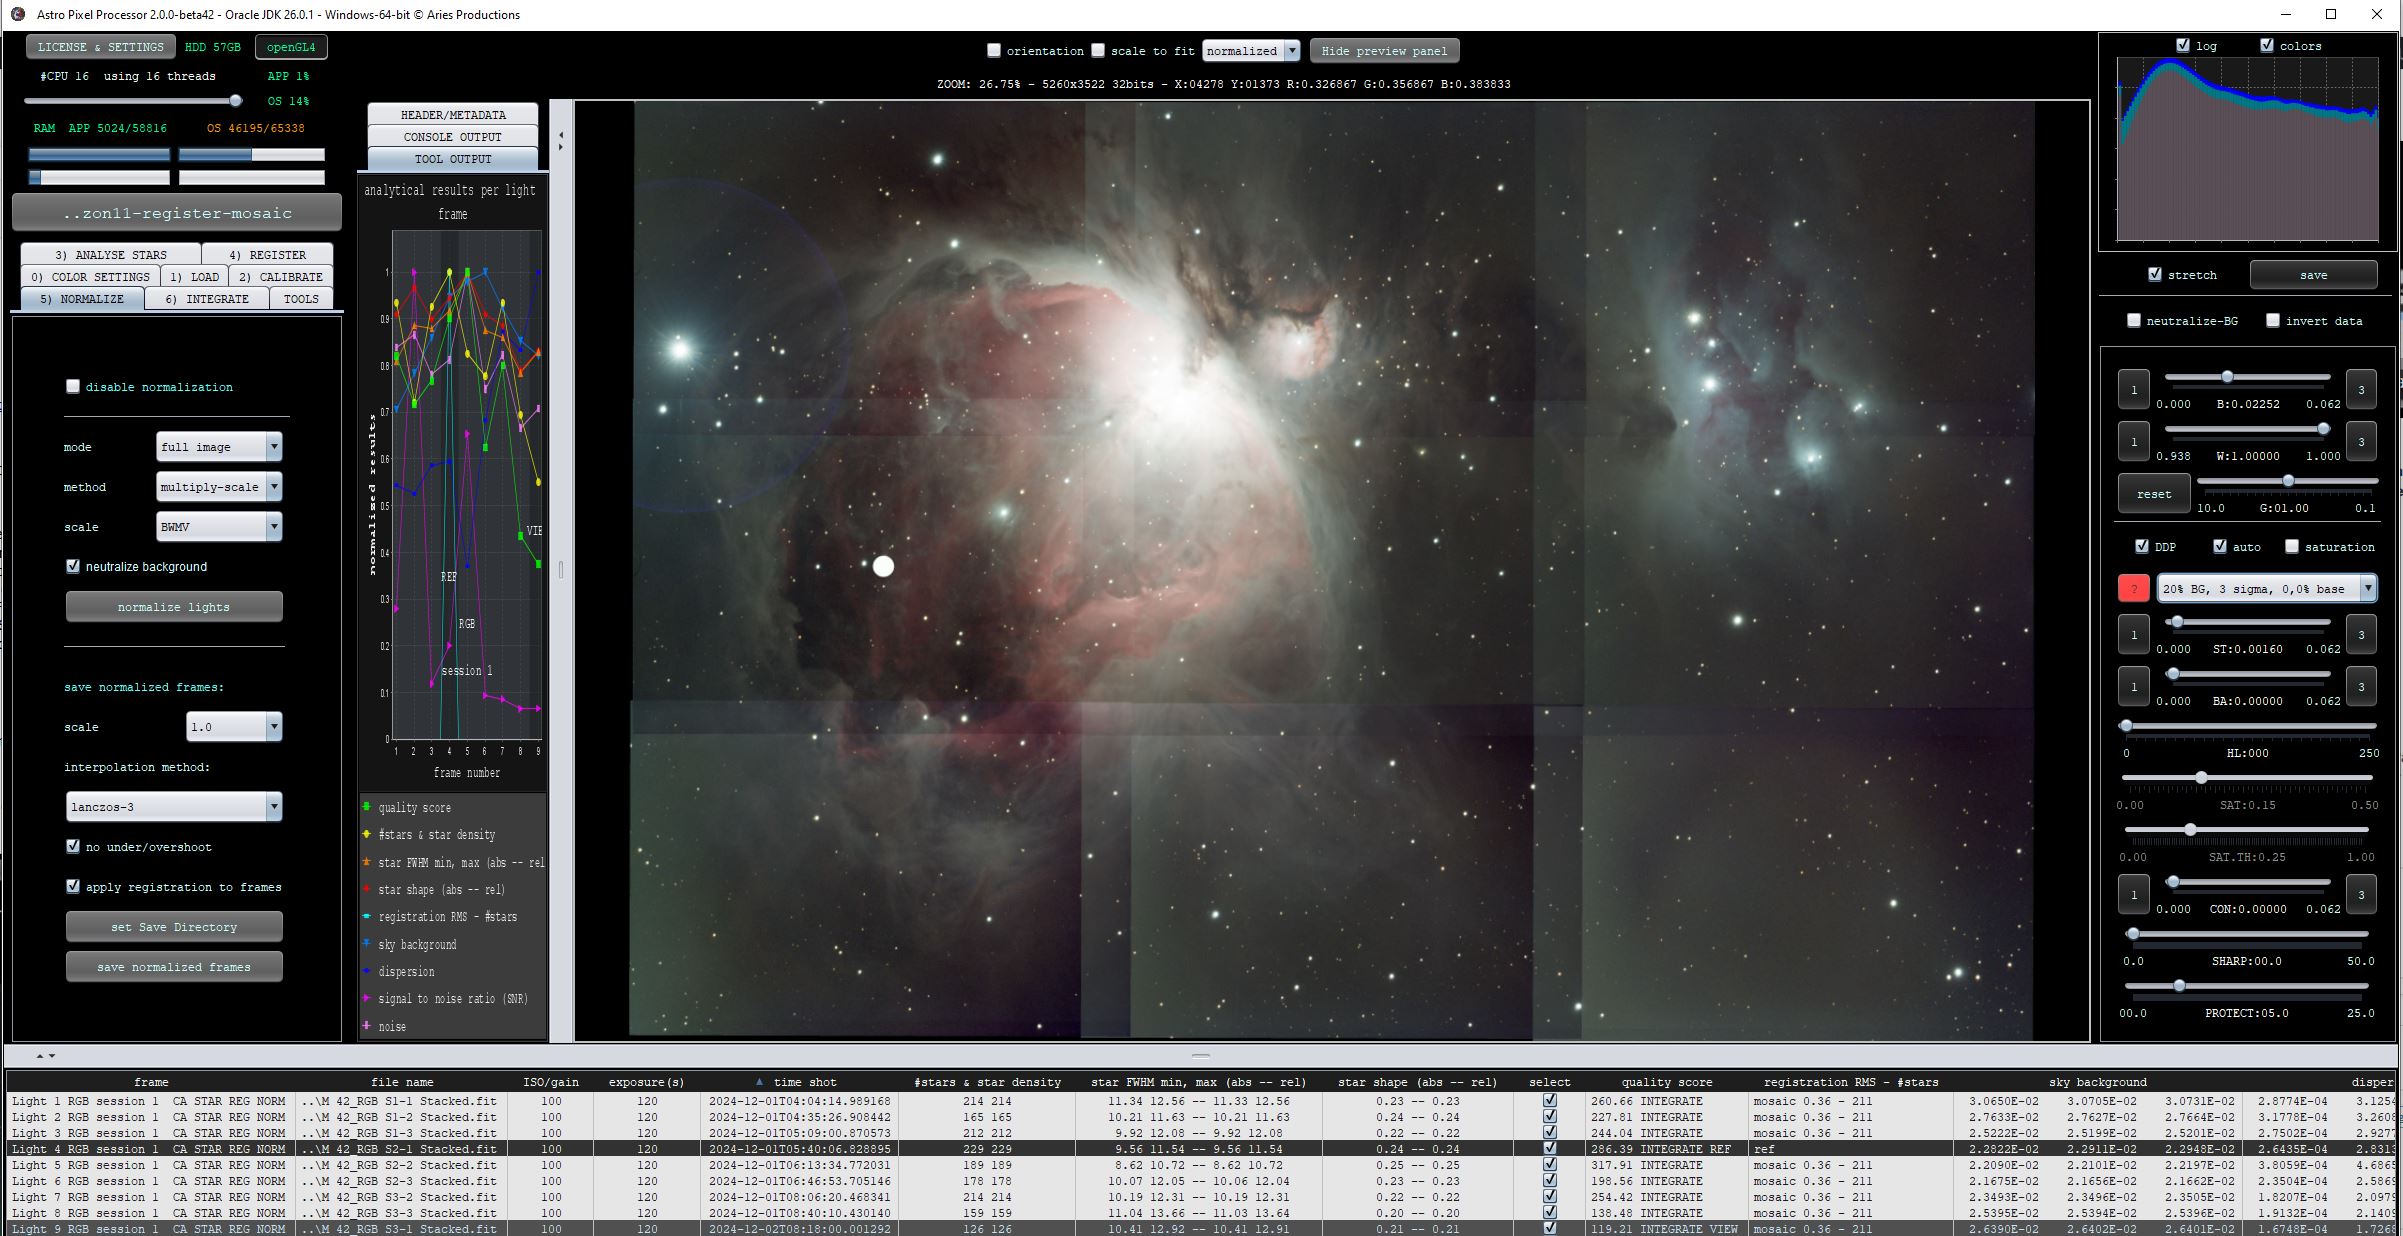
The new tooltips are shown in the next screenshots:

Thanks for your reply
Ok, I understand the extra time for normalization. No problem. Result was fine.
I will do some different test on my dataset and will come back to you
Best
Hi Philippe @philippe-bernhard,
Thank you very much for sharing your concerns and feedback.
.
I agree that normalizing different filter data can be difficult epsecially if some filters have strong gradients/light-poillution. In those cases, normalization can be improved if you normalize without scale, so use add or multiply without scale. But best would be that the data is corrected for the gradients before the scale is calculated actually. Then all should work robustly, so also normalizing between broadband and narrowband filters.
What I want to implement to make this work better overall and for your case, is to have Local Normalization Correction to be applied before 5) Normalize, then the gradients are gone and dispersion measures are not affected by any possible gradients. Or maybe better, the data to be normalized should dynamically be corrected for gradients (like LNC does) and the parameters should be calculated on those corrected images. I need to test which is the most efficient and fast way to make this work and implement in APP going forward.
Hi Mabula, the option (to dynamically correct for gradients, as LNC does) is the better one. This is because a script called NormalizeScaleGradient (NSG) uses this method very effectively.
First, a noise calculation is performed for each image, then the gradients are corrected, and finally the scale is calculated. This also makes it easier for the rejection algorithm to perform its integration.
With this method, a separate reference frame is defined for normalization (the one with the lowest noise and fewest gradients in the image, usually with the smallest median).
So, separate reference frames are used for registration and normalization.
Best regards, Henry.
Thanks for your reply
Ok, I understand the extra time for normalization. No problem. Result was fine.
I will do some different test on my dataset and will come back to you
Best
Great Phillipe @philippe-bernhard,
That is good to know, please share a dataset that creates a problem in this sense if you find one.
Mabula
Hi Mabula, the option (to dynamically correct for gradients, as LNC does) is the better one. This is because a script called NormalizeScaleGradient (NSG) uses this method very effectively.
First, a noise calculation is performed for each image, then the gradients are corrected, and finally the scale is calculated. This also makes it easier for the rejection algorithm to perform its integration.
With this method, a separate reference frame is defined for normalization (the one with the lowest noise and fewest gradients in the image, usually with the smallest median).
So, separate reference frames are used for registration and normalization.
Best regards, Henry.
Hi Henry @minusman,
Indeed, we need to pursue this way I think. I have added this to my issue list and have set it as a very high priority. I have some widefield mosaic data that was not corrected well for vignetting and then you get many issues is you do not correct for gradients first.
Mabula
