June 24 2026 APP 2.0.0-beta46 has been released !
Improved internal memory configuration (lower ! memory usage), fixed beta45 startup issue, fixed Set Save Directory & 2-panel mosaics.
May 27 2026 APP 2.0.0-beta45 has been released !
Fully Multi-Threaded LNC, many improvements for the registration engine, platform upgrade, and further tuning of internal memory consumption and memory release back to OS.
Apr 14 2026: Google Pay, Apple Pay & WeChat Pay added as payment options
Update on the 2.0.0 release & the full manual
We are getting close to the 2.0.0 stable release and the full manual. The manual will soon become available on the website and also in PDF format. Both versions will be identical and once released, will start to follow the APP release cycle and thus will stay up-to-date to the latest APP version.
Once 2.0.0 is released, the price for APP will increase. Owner's license holders will not need to pay an upgrade fee to use 2.0.0, neither do Renter's license holders.
Hi
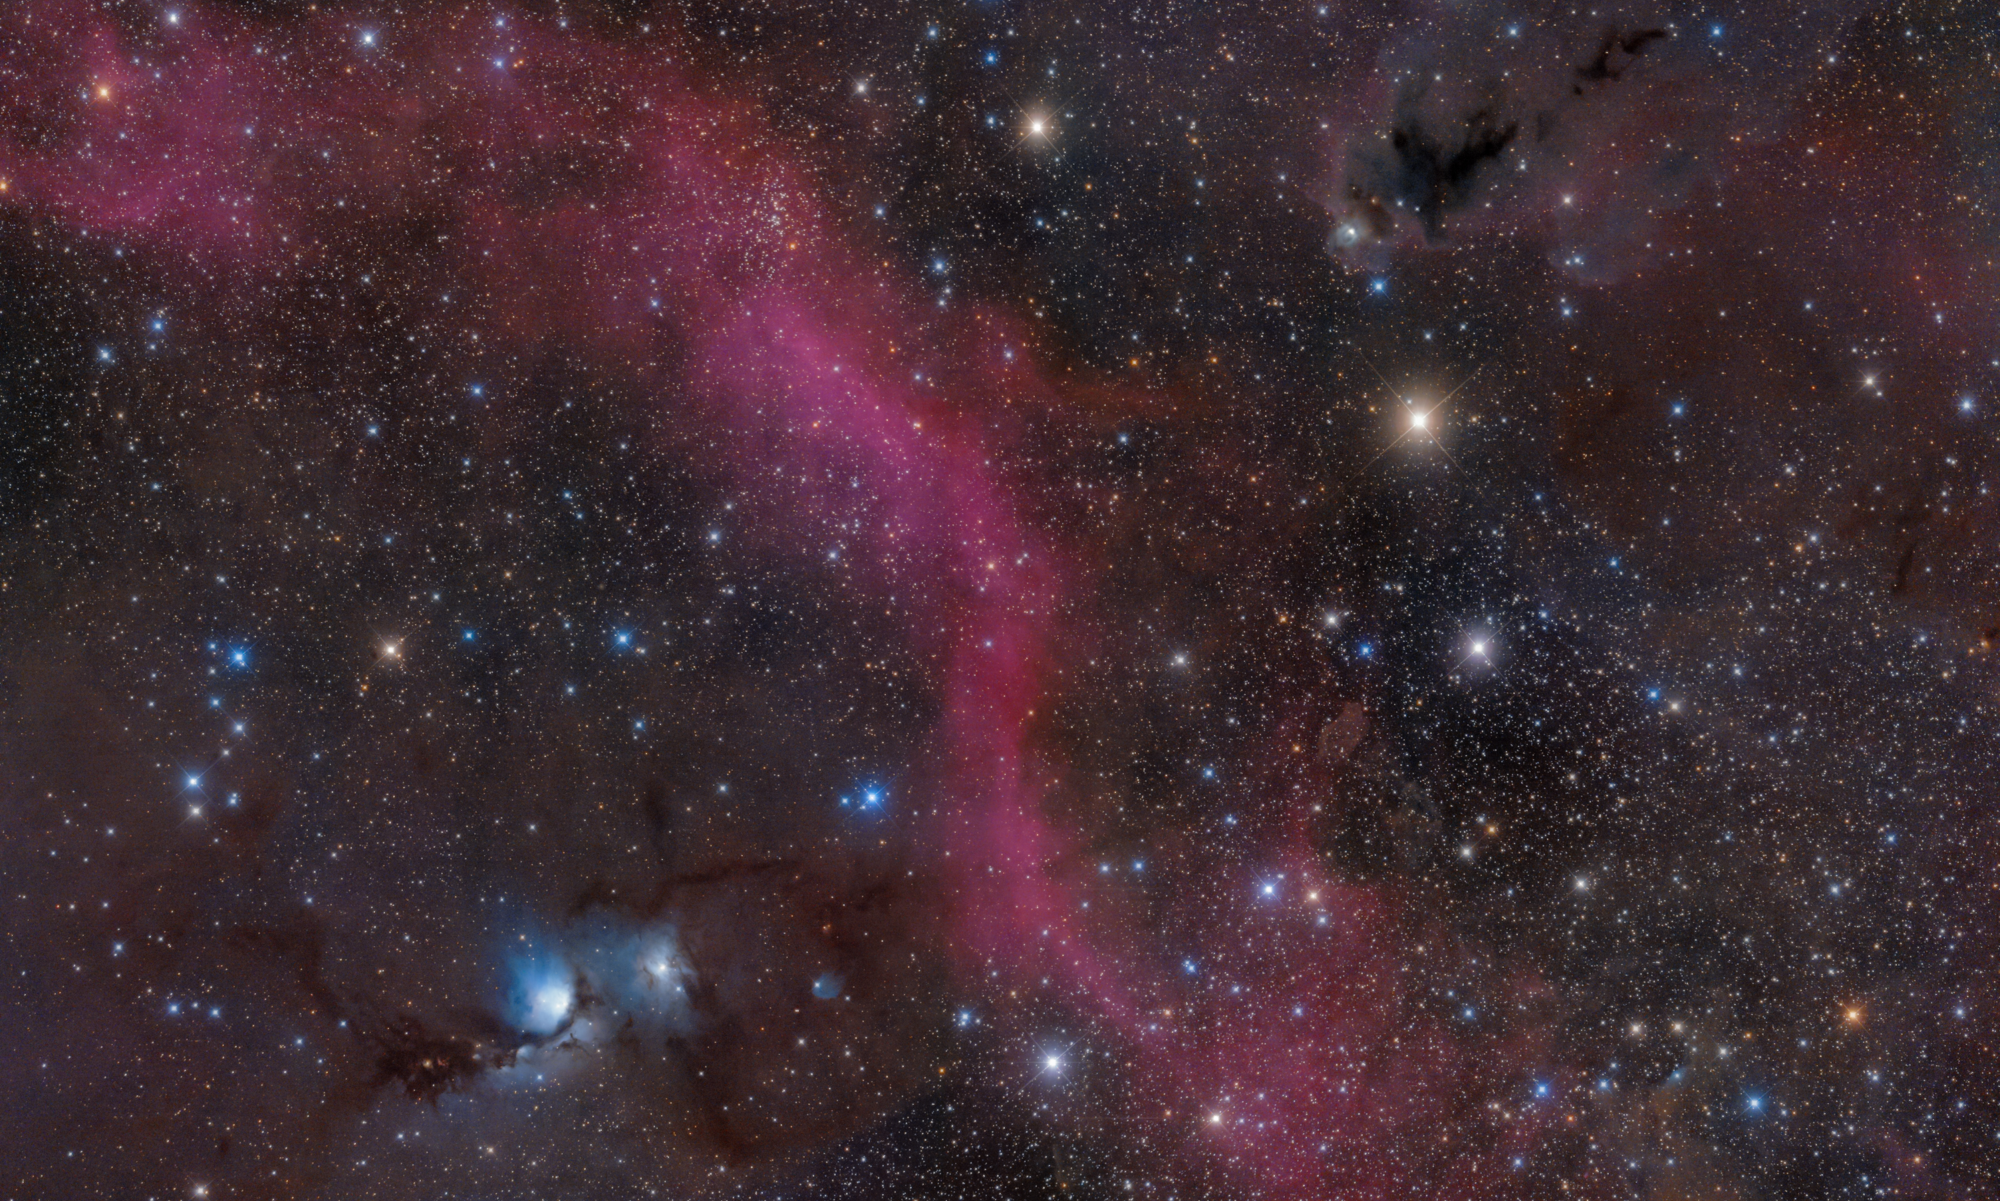
I've been following the Milky Way Mosaic tutorial since I want to do the same, but when I try to remove the light pollution it gives a blue tint to some of my panels. Can somebody help me remove the LP of my image ? I uploaded the .fits file here if you want to take a look at the mosaic https://www.swisstransfer.com/d/5d8991dc-ed30-478d-88f0-d8864465f1cf

You can see that the bottom center panel has a blue tint and since it's right on the MW I can't place a box here
Thanks !
@thelastharpy32 I downloaded the image and in the original the panels, that show up blue in your screenshot, are not dark but show colored details already:

If you make them black like the rest of the foreground then your problem will go away.
@wvreeven I'm talking about the blue tint on the Milky Way, of course the foreground isn't a concern since I'm gonna remove it anyway, but if you look at my screenshot, the MW gets blue too.
@thelastharpy32 OK thanks for explaining that. If you increase the saturation of the image to the max, like this

then you see that there is a lot of blue in the Milky Way parts anyway. I am afraid that it is going to be hard to process this image and I think that the fact that the foreground isn't fully dark interferes with the light pollution gradient calculations in APP.
@wvreeven Would exporting the mosaic as a 16bit tif file, removing the foreground in Photoshop, and then removing the LP in APP be a good idea ?
It's quite challenging indeed, but I got word mabula managed to get it nice, so hang on. 😉
Hi Jose @thelastharpy32 & @wvreeven,
I have had a look myself and have tried to correct the Light Pollution 😉
First of all, yes this is a complicated one to correct, because
- not all panels are blended nicely especially the middle bottom mosaic panel
- little space besides the Milky Way on the top right to place model selectboxes to create the model
- The mosaic as a whole has a very illogical Light-Pollution model it turns out, this must be the result of difficulty in blending the panels I think with MBB and LNC to create the mosaic.
But, luckily, with patience and experience, much more can still be accomplished.
When you start the Light Pollution Removal Tool, try to stretch strongly and over-saturate as much as you can, set the SAT TH slider to zero to saturate the sky background as well. That really helps to see the gradients 😉

Now start placing area/model selectboxes on the left and right sides of the Milkyway, only a couple. Click Calculate and then add some more, slowly correcting small parts of the image. Do not try to correct the whole image at once ! That will never work. It is an iterative process where you converge to a nice result by slowly making the correction model.

Look at the model as well, see how illogical it looks... because of the difficulty in blending the mosaic.

Now the auto-stretch DDP has a hard time, because of the mountains in front... so disable the auto selectbox on the right and start stretching manually. Adjust the B(lack) slider and ST(retch) slider slowly to see more detail:

Much more to see already 🙂 You now clearly see a severe problem with the bottom middle panel... At this point I do have a good idea of the model and where I should place area/model selectboxes. I removed all the selectboxes and start placing new ones, also in The Milky Way from top to bottom, again iteratively, only a couple of boxes at at time, calculate and then continue with just a couple of boxes, lik 3-4 each time, don't place more, because it will be easy to lose control over how the image will be corrected.

As you can see, I was able to remove the blue glow besides the Milky Way, by placing area selectboxes a little bit closer to the Milky way, each time I added some boxes after a new calculation... I was also able to correct the bottom middle panel for a large part.
Hope this helps and will enable you to try yourself to get such a result 😉
Mabula
Thank you very much for your answer ! It helps a lot, I'm gonna try a new integration with LNC to see if it helps too 🙂
