June 24 2026 APP 2.0.0-beta46 has been released !
Improved internal memory configuration (lower ! memory usage), fixed beta45 startup issue, fixed Set Save Directory & 2-panel mosaics.
May 27 2026 APP 2.0.0-beta45 has been released !
Fully Multi-Threaded LNC, many improvements for the registration engine, platform upgrade, and further tuning of internal memory consumption and memory release back to OS.
Apr 14 2026: Google Pay, Apple Pay & WeChat Pay added as payment options
Update on the 2.0.0 release & the full manual
We are getting close to the 2.0.0 stable release and the full manual. The manual will soon become available on the website and also in PDF format. Both versions will be identical and once released, will start to follow the APP release cycle and thus will stay up-to-date to the latest APP version.
Once 2.0.0 is released, the price for APP will increase. Owner's license holders will not need to pay an upgrade fee to use 2.0.0, neither do Renter's license holders.
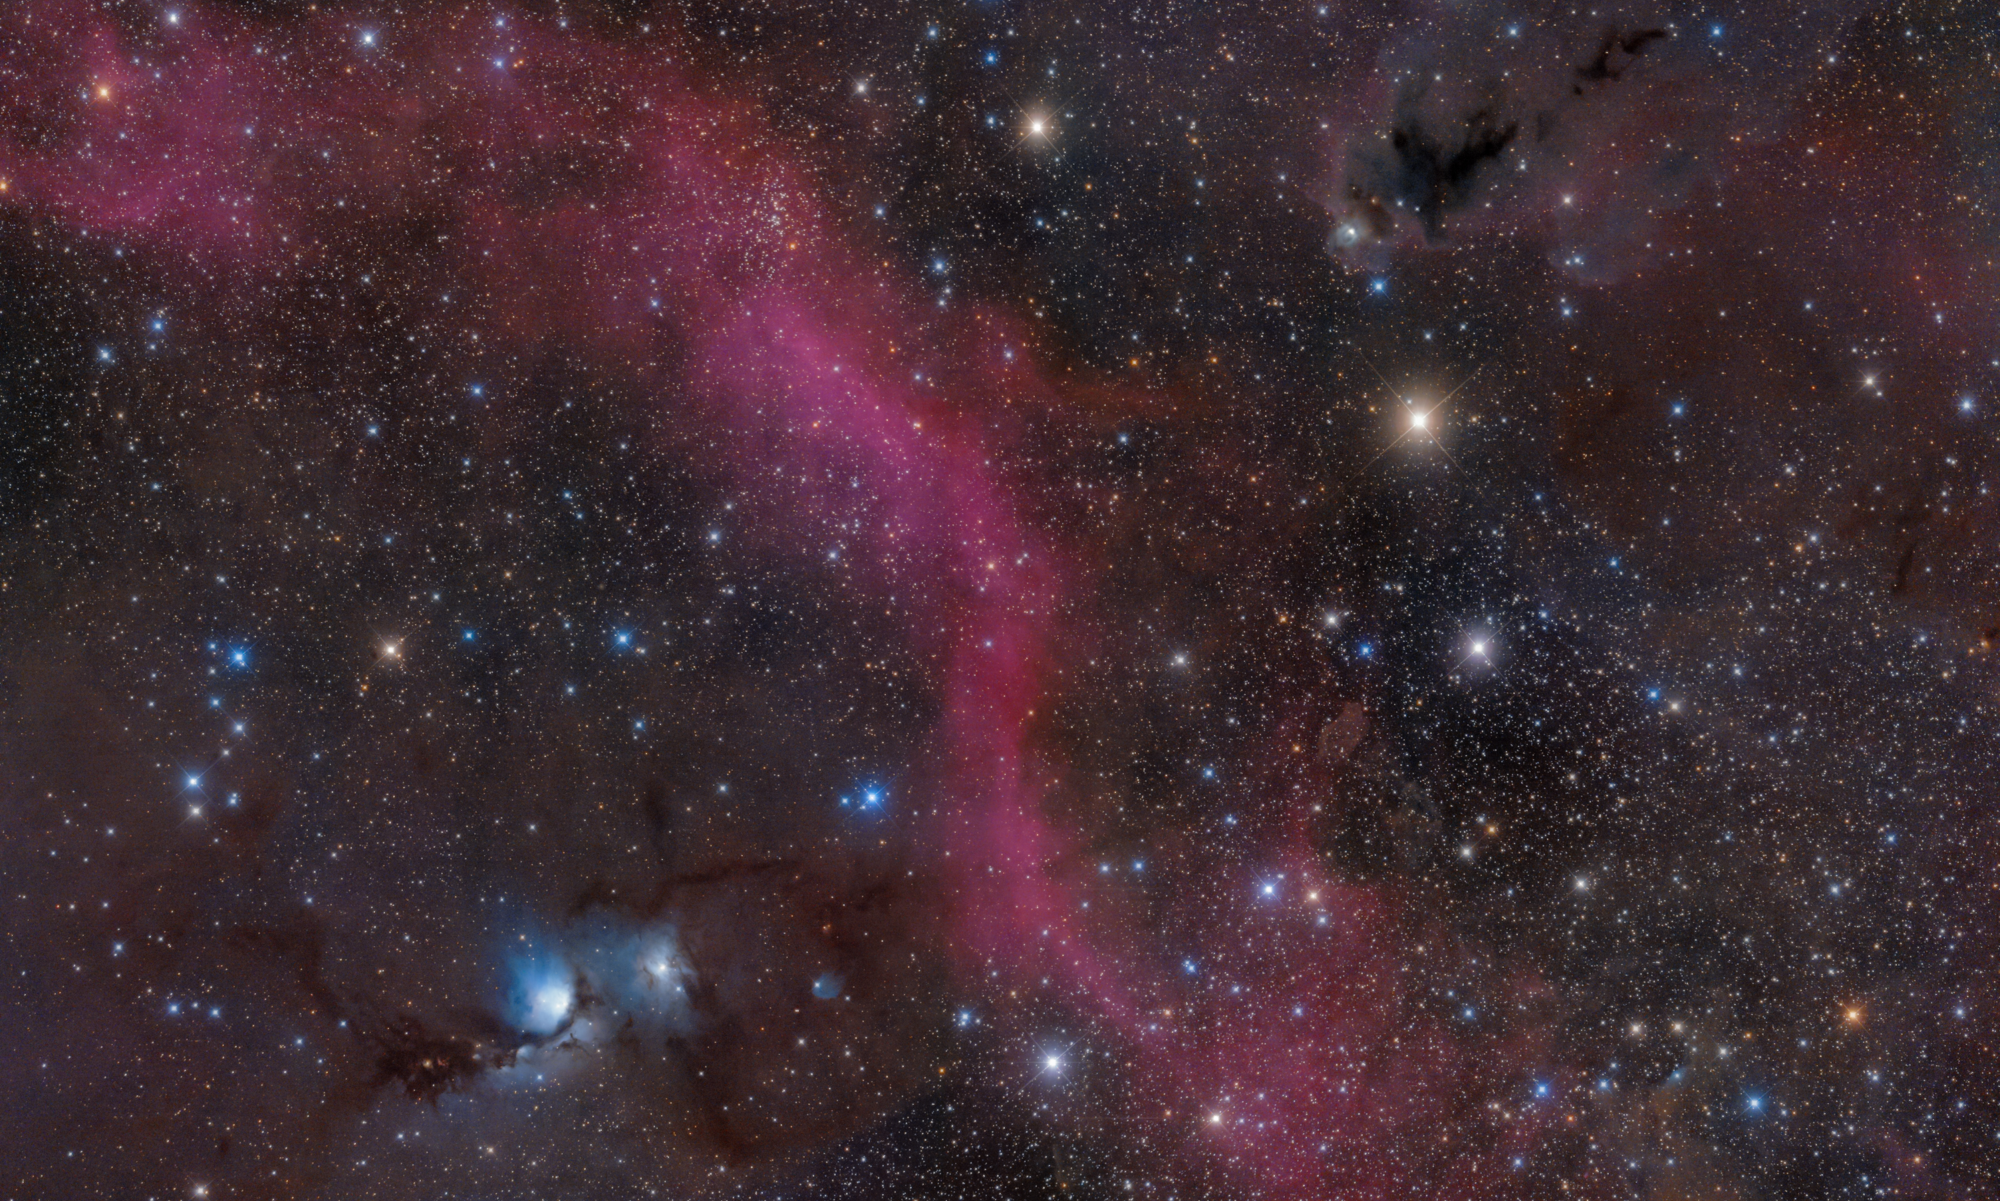
Hi, I'm a bit new to mono/narrow-band imaging and have just completed a test.
Is there any comment as to way there seems to be a graduation of the background in the attached image? Above the top yellow line there is none, below the bottom yellow line there is a purple contrast. And a bit green in between.
Is this natural for this target? Or do I have some issue with my set-up that creates this?
Would appreciate any thoughts,
Regards,
Chris

Did you do any light pollution correction on the result? I would start with that first.
@vincent-mod
I did not do anything. I sometimes do remove light pollution but I did nothing on these ones as I had seen this graduation after removing light pollution.
And because there is so much nebulosity it is not easy to find a place for the boxes. Can you give some suggestions on this?
Much appreciated,
Chris
Hi Vincent:
So in trying your suggestion, it took most of the graduation out of the image. I didn't do it because I thought I had read that you should box the nebulosity. But that seems to be not the case?
If you can confirm for me.
Thanks,
Chris
Best way is to stretch it a lot (30% stretch settings) and increase the saturation by a lot. Then you try to place boxes (small are ok as well) on background with no nebulosity. If not possibile, you can try to set it on the absolute lowest nebulosity patch you can find. Then you check it and place boxes towards the problem areas, not directly on top, until the result looks nice.
Hi Vincent - I did a lot of the background removal, combined the result and got this. Any ideas why

Chris
Wow, that's a very odd result. Are you by any chance working on an external drive or something?
No, not external. It's kind of strange, I had combined using SHO3 and got this. I cancelled and re-entered the RGB tool and combined using SHO2 and it was fine. I then changed the formula to SHO3 after, recalculated and it was fine again. That's all that I did, same data.
Playing with removing light pollution the way you suggested did clear up the graduated background. It was quite tedious in that it was like chasing a phantom at times.
Thanks for your help, really appreciated it.
So this mix-up was there when you switched formulas all of a sudden? I will pass that on at least.
It happened by loading the files using SHO3. I then started over using SHO2 and it did not happen.
That actually happened twice, both with SHO3 being the formula used first.
It wasn't about switching, it was the initial result using SHO3.
If I started with SHO2 it was fine, and then switched to SHO3 and it was fine too.
What I like about SHO3 is the combination brings out the Trapezium stars. All the others this is blown out. That is excellent!

I can't get around the magenta stars which is not so good!
Hope you can see detail in the small snip of the Trapezium!
@chrism5527 Interesting, if you can repeat this behavior it might be either a bug or something with your graphics drivers perhaps. Are you using the latest APP version and on what OS?
Great you do get a nice result in the end though! 🙂
I can't get around the magenta stars which is not so good!
Hope you can see detail in the small snip of the Trapezium!
Yes, that's likely the result of how the formula is set. You can tweak those colors a bit by changing the formula yourself or doing some HSL tweaking. More on the HSL is in this post: https://www.astropixelprocessor.com/community/postid/21287/
I'm not so good at some of the other tool modules. I will definitely read as I'm just learning.
I have to respect the tools that got me to the end - AP155F7 is mighty nice! And APP too.
I am using Windows10 Pro. 32GB Ram and a AMD Ryzen 7. Can't remember the graphics card, not overly fantastic but ok AMD one.
It did not repeat again, unfortunately.

I was playing with HSL per your link and I broke it again. I was following the steps and hit show current image and got the freak again.....

Not sure what I did here.
It is weird indeed, what happens if you switch off OpenGL by clicking on the GL button on top of APP?
That fixes it. I know I should just look it up, but what does that do? Did it change the events in the HSL tool and I need to start over?
It switches to CPU processing. So that is a big indication that your graphics driver (the software, not your card itself) has an issue. Maybe try to update your graphics card driver.
Ok, will do. Thanks.
I don't mean to be a pain, but it is not clear what exactly the steps are using the HSL tool per the link you sent. There seem to be steps that are not noted. Like after getting the mask and adjusting the B YE slider, the image is now different. What was done to get that image? If it is calculate current adjustments, I get no changes whatsoever. It is confusing....
Let me get back to that tomorrow, it's bedtime here. 🙂 In the mean time, just experiment a little and try to follow the link to see if you can get it nicer.
Ok, thanks and have a good night.
Chris
Sorry Chris, took a bit longer. Did you get chance to experiment with it a bit more?
No worries Vincent - thanks for getting back to me. I did play around and didn't really achieve anything. I set the mask per the link. What I'd like to know if possible is the exact steps to complete this tool. Or what each highlighted action means/does would help too.

For example, setting the mask, do you then it show color selection? Or show current image? Calculated current adjustments? Nothing really worked for me and it is kind of like shooting in the dark if I can't understand what each step is and what it does. If you can understand what I'm saying.
Thanks,
Chris
Yes these can be a bit confusing. Basically you can play around with the the color selection range and test what would work. Then you change it to values you want and if that indeed is the image you now want to work on further, you can select "keep current adjustments". This will then allow you to work further, with new adjustments if needed. "Show original image" is the image without the adjustments, "show current image" is the switch back to your adjustments on the original images. If you're happy with it, you can save the image.
