

2026-10-09 APP 2.0.0-beta48 has been released !
This is mainly a bug fix release for the reported bugs in beta47. In addition it has a significant User Interface performance improvement noticable when you need to process 1000s of images in APP.
2026-10-03 APP 2.0.0-beta47 has been released !
This is a very big release... many code optimizations/rewrites, many parts of APP are much faster and more precise, especially star analysis and registration are much faster ! Big mosaics will go much faster 🙂
And we introduce a new preview filter, which includes the new Adaptive Deep Sky Stretch and a General Levels Stretch, this has been long over due. The old preview filter (the panel on the right side to stretch and preview your data) has not been updated for a couple of years and it is a critical part of any APP session.
Adaptive Deep Sky Stretch or ADSS is a much more intuitive stretch algorithm. It is also color preserving (which is a great new addition in itself ! ) which means that the highlights are no longer bleached, color is maintained from the linear data while stretching. You can simply stretch your data using the sky background level and signal width sliders which work much easier and more intuitive. You no longer need to fiddle with the old complicated sliders with zoom buttons. All the zoom buttons for the sliders are made redundant. And you can enter slider values in the slider value fields yourself. I will make a youtube video in the coming days to explain and fully introduce ADSS. Once the video is ready, it will be highlighted on the forum.
RGB Combine upgrade !. The RGB Combine Tool has been rewritten mostly. The tool is faster and easier to use and most importantly, the Luminance slider to inject a luminance channel or channels into the RGB composite is now working correctly. It no longer bleaches the RGB colors. Combined with the new ADSS preview, you will get much better and easier great composites with great color! I will also explain this in a new youtube video.
There is one file handling issue that I don't think works as it should. At the end of the Calibrate tab, there is a button to set the save directory. I initially thought this was a good feature so I could direct my calibrated lights to it's own directory, but in fact after using it, all file output ended up going my calibrated lights directory. So it kind of made it pointless to use it. I end up just letting it save in the working directory and then moving the calibrated lights.
Hi @astrogee,
I have tested it and it works correctly as it is, at least in the soon to be released beta47. Which version are you using. I think versions prior to beta46 had a bug in this regard as well. So make sure that you are using beta46.
Please look at this screenshot:
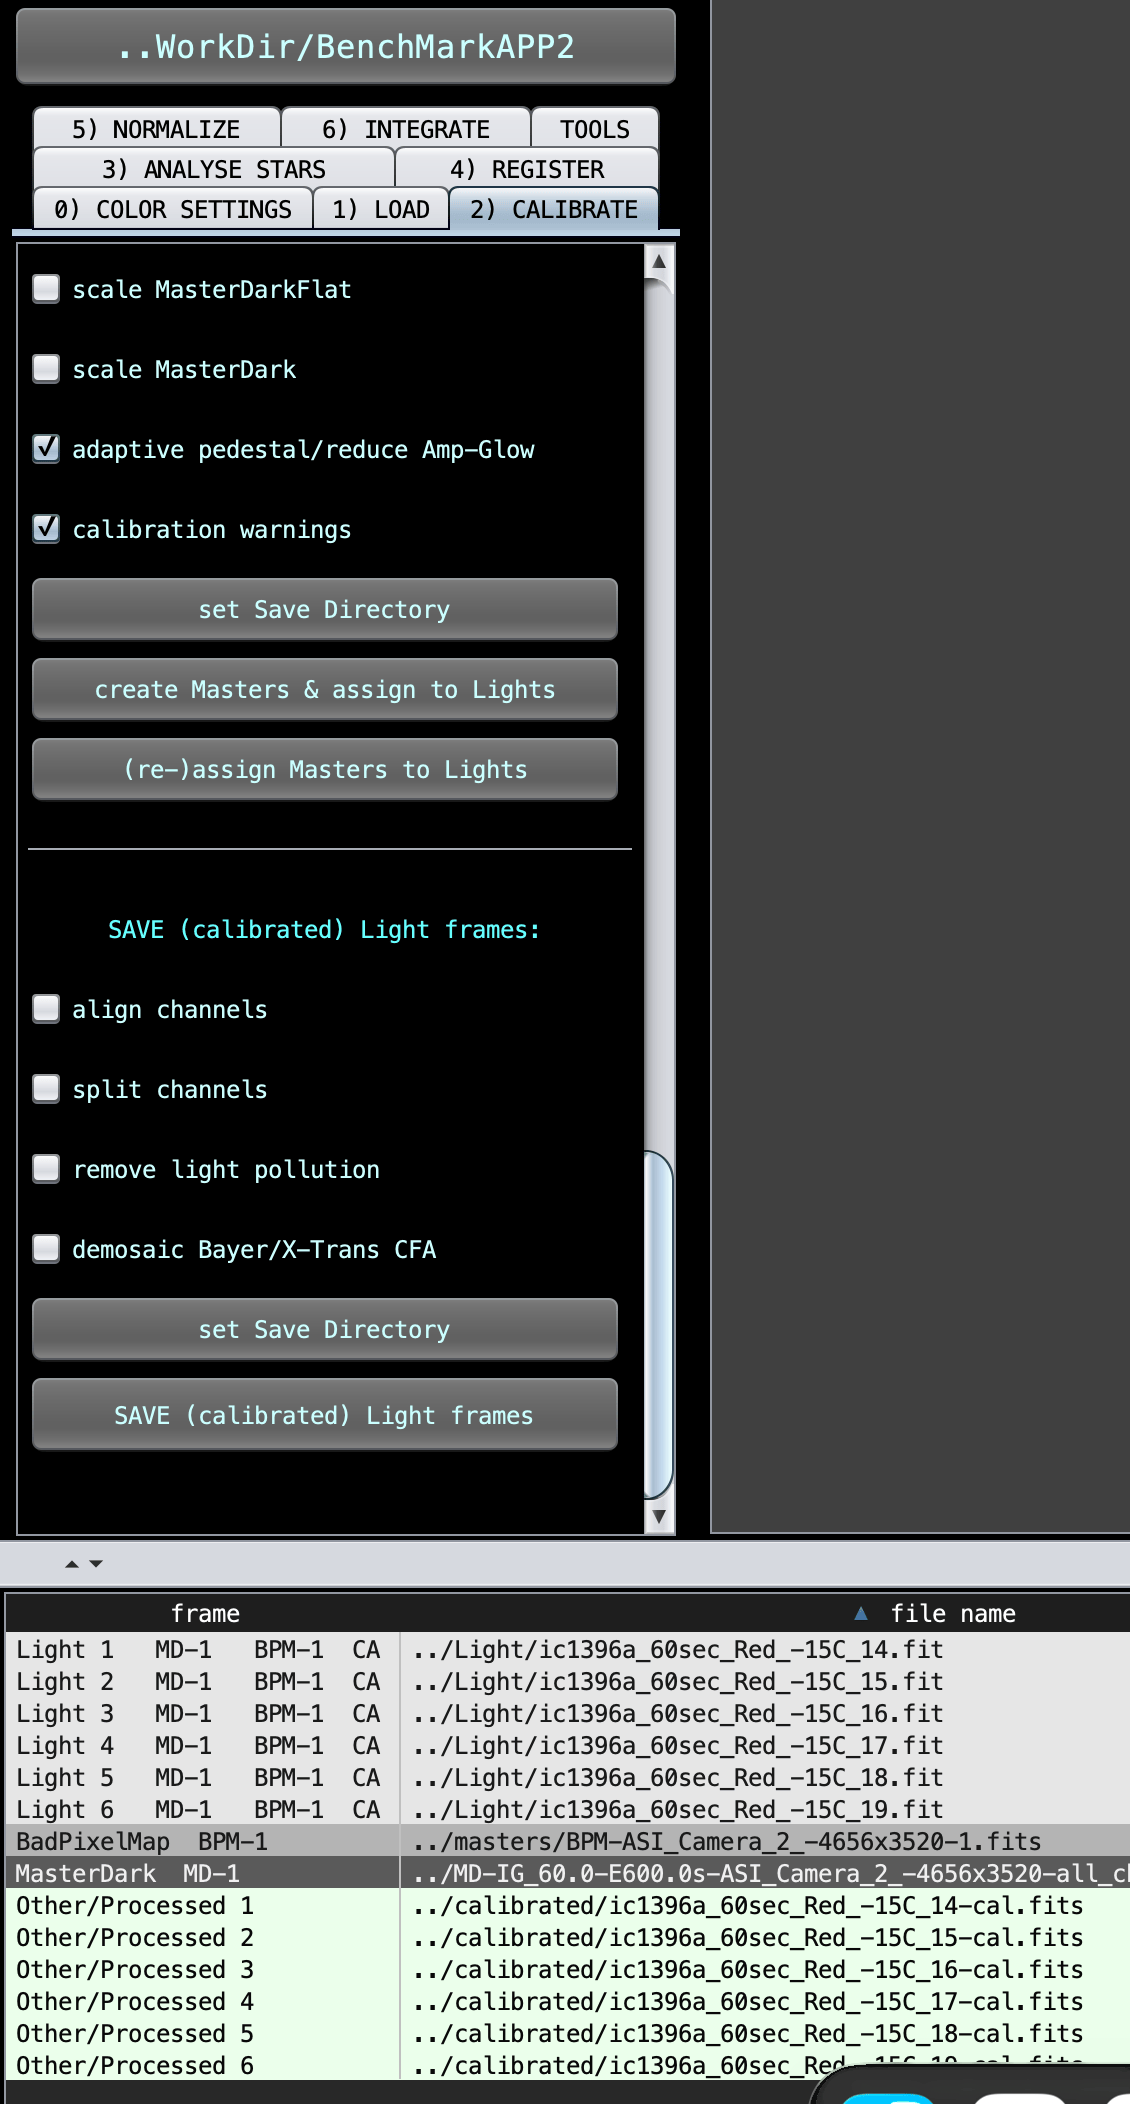
You see 2 buttons actually in the 2) CALIBRATE menu called set Save Directory.
The first button controls where the calibration masters are saved. I set it to /masters/. The BPM was created and saved there. (the masterwork was premade).
Then the 2nd set Save Directory is for saving the calibrated light frames. So I set this directory to /calibrated/ . I clicked on Save Calibrated Light frames and they were correctly saved in the /calibrated/ folder as you can see from the screenshot.
Maybe the 2 buttons did confuse you in this case?
Let me know if this solves it or not 😉
Mabula
Hi @mabula-admin, thank you for your reply. The problem is that when one goes to save other output like say a stretched jpeg or tiff (top right save button), the output also goes to the calibrated lights directory. So it seems that the set save directory is overriding the working directory instead of creating a calibrated lights directory. I don't think this was intension.
PS:
I'm using beta46
Also, I think it would be nice if the set save directory would create a permanent relative path so that subsequent session processing will put the files in the same relative place and I don't have to set it each time - i.e. my folder arrangement is always the same relative to the working directory. Thanks!
